maandag 29 oktober 2012

First repair job.

Recently somebody asked to repair an old window from the 1930s. Never did something like that before and I like a challenge.

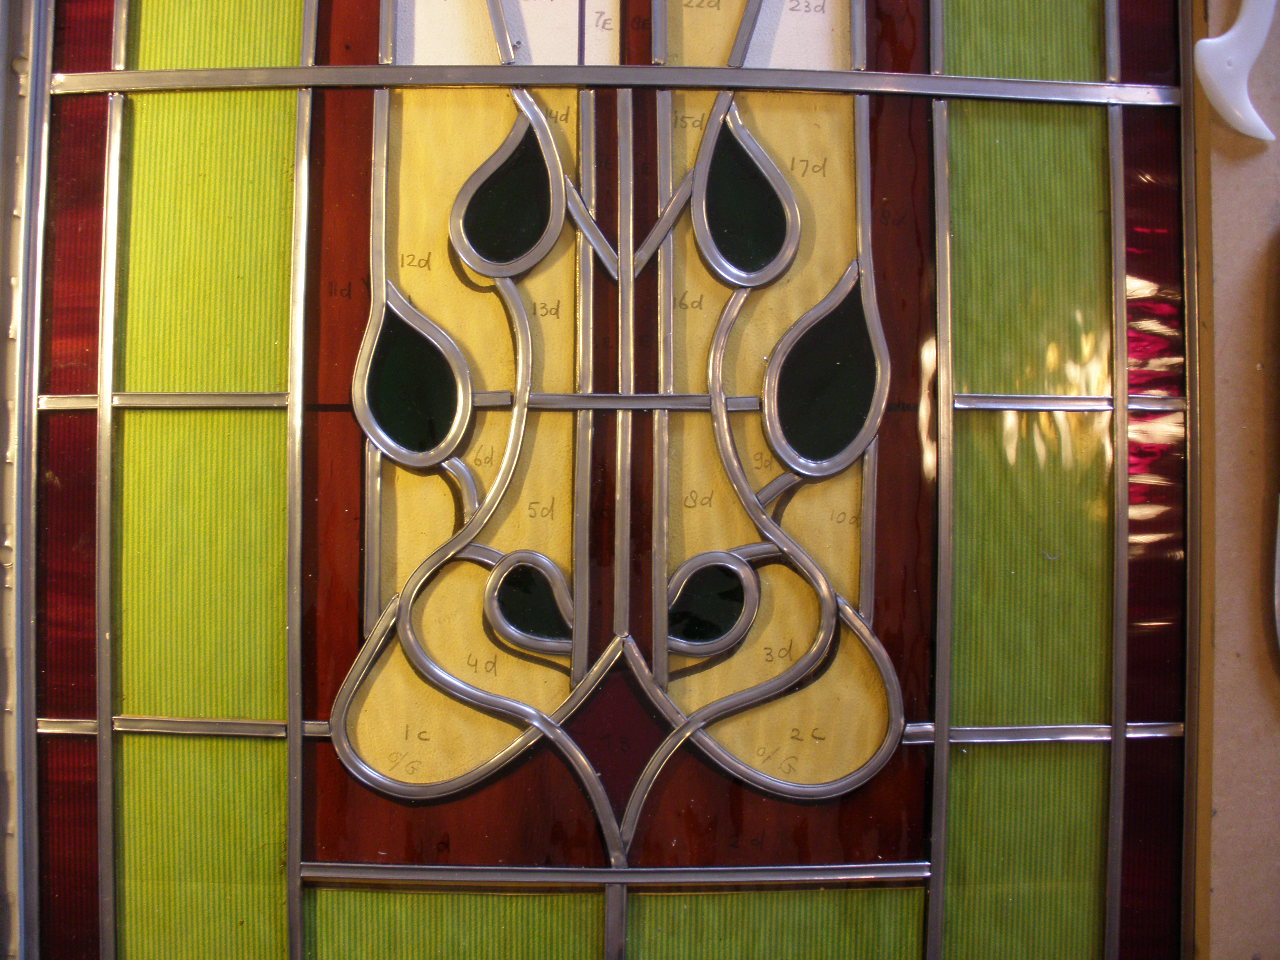
This is what it looked like when the person brought it in.


One of the pieces was broken. A glass-friend had an almost similar glass panel I could buy from her and the owner and I decided to replace all the pieces of the same colour.


Most challenging I found was removing the lead. Very easy to break the glass you see :-)  But nothing happened and after a while the glass was free of broken, and dirty lead and pulverised plaster which was used for making the window water tight. Dusty job as you can see here!


Before starting this I did read about the safety conditions working with (old) lead. For instance the dust from the old lead is very unhealthy and to prevent this dust flying around the lead cames and strips should be made wet before you start working on it.


Second challenge was cleaning the glass. I tried a few methods like rubbing with steel wool, soaking the glass in a water and soap solution, and in water with a dishwasher tablet in it, in water hydrochloric acid (mixed with water).
The hydrochloric aced worked best (with the worst smell....) but the glass was clean. 
New lead was used to put the window together again and this is the result:


New life, regeneration, growth, strength and peace.

Found inspiration in a picture I saw on a site of a Maori symbols and specially liked the KORU symbol. This is the website: http://www.squidoo.com/koru-maori-design : The Maori Koru design is scroll/ spiral shaped and is derived from the frond of the New Zealand fern plant. 'Koru' is the Maori word for the new unfurling fern frond. The pattern is used in many Maori and New Zealand art forms and symbolizes 

new life, regeneration, growth, strength and peace. 


For many this design is the symbol for renewal, hope for the future. Because everything continues and is reborn. Or as the ancient Greeks said: 'Panta Rhei': everything flows.


My life going as it does I can relate to these wise words. 

Hope you like the panel I made.


dinsdag 2 oktober 2012

The new window in it's place!

Finally the Tiffany window is finished. As the sun shines so beautiful in our kitchen I had a first look at it in the kitchen window and I'm really pleased with it.
Scroll down to see the photo's of where this window was made for.


A look from the outside.


And here from the inside. 
(So difficult to make a good photo!)


maandag 17 september 2012

Never ever quit! Opgeven is geen optie!


Isn't it wonderful that sometimes somebody surprises you.
In my case a cousin took it upon himself last year to start training to cycle the Alp d'Hu Zes fund raising action.
This is a cycling tour of the Alpe d'Huez which is one of the main mountains in the Central French Alps, 3.330 meters high and the climb is 13.8 km at an average 7.9 per cent, with 21 hairpin bends!

His plan was to cycle this mountain 3 times in one day. Not alone but together with thousands of other hero's.
Eventually he managed it 4 times, every time in honour of a family members who fought cancer, and the third time he had said was for me! WOW! That is fantastic.

To explain about the fund raising, here is a part of the text I copied from their website (http://www.opgevenisgeenoptie.nl/missionvisionuk)
"Alpe d'HuZes was created with the aim to empower people to convert the sense of powerlessness, caused by cancer, into one of strength. We achieve this by motivating as many people as possible to constantly challenge and expand their boundaries. Alpe d'HuZes wants to raise funds to fight cancer by cycling up the Alpe d'Huez six times in one day. The name, Alpe d'Huzes, is a combination of the Dutch word for "six" and the name of the mountain
Alpe d'HuZes is founded on the absolute belief that you can attain the greatest possible satisfaction if you put your heart and soul into helping others."

Because of this I could not sit still and started making a glass panel for him to remember this special day.

On top it says : ALP dHU 6 and at the bottom his initials WH and MMXXII (2012),


zaterdag 11 augustus 2012

This is fun

Since making things with glass I found that creating something like a panel or a window is very satisfying.
I was surprised though that after making a panel for a friend I found it almost hard to part with it.
With this window I will not have that problem as it will be placed in front of a side window in our livingroom.

The design has a special meaning and when I have finished cutting the pieces I'll post a new photo and then I'll explain how to "read" the window.


The pattern

This is the pattern with the intended colours. I found really nice glass to work with and that of course will look so much better than a drawing.


maandag 28 mei 2012

Back for more .... reprise

I hope nobody notices the gap of 4 months between the very, if I may say so myself: enthousiastic post last time saying "Back for more",  and this one. :-)
Anyway, time flies when you're having fun and it is true as some renovations at home came first and the livingroom looks great.
Also, designing a window or panel is much more difficult then making one. I have difficulties putting my ideas in a drawing on paper or in a computer program and then it takes time to work out the colours and which glass to use.  Problems, problems....

But here it is: my latest and very own design.  I have drawn it (like my other windows) on green paper which is actually wall paper and easy to draw on because of the lines and using it when I have cut out all the different pieces I find it very strong and a little water resistant which is good.

As I have had a somewhat difficult time over the past year and a half, I have tried to symbolise this experience and my little family of 3, who have helped and supported me so much, in the design.
In my next post I'll put in a photo with a little more colour so you will have an idea of how it will look when finished.


vrijdag 6 januari 2012

Back for more...

It's been a while since my last post, but I'm back.
Our livingroom has been renovated and the door with the stained glass window has been painted in a creamy white colour. We think it looks so much better.
View from the hall.


We have been busy :-)  and we also moved all my glass-stuff from my room upstairs to the garage, which gives me a lot more working space and I've started on 2 projects already.

donderdag 2 september 2010

Some Tiffany panels.

While I'm working out what next stained glass window to make, I have been making a few gifts for family and friends. They are made with the Tiffany technique which I really like to use, especially for the more 'delicate' designs. 
There is still a lot to learn and techniques to master, but I learn something new with every panel I make and get more experienced in the soldering for instance.

The three panels below maybe look alike but are very different at the same time.
The one on the left was my first flower and has no real frame around it. The leaves should look different too. Let's call that 'the artists previledge'  (..)
The second one in the middle, a rose, has a lead frame around it. The same lead strips I use for the stained glass panels. You might say that this makes it look more complete.
The one on the right is slightly bigger, with the glass frame around it. 
A tulip again, great leaves this time :-) and some sunshine added.
Giving the design a frame in a different colour and letting some parts of the design as it were 'on top' of the frame and of each other, this gives the panel more depth. 
The two little hooks I made from tinned wire. and soldered them on to the frame.
(Don't forget you can click on the picture to enlarge it.)


maandag 9 augustus 2010

Marianne's panel

Marianne kindly sent me this photo and it looks beautiful here in her home.


Posted by Picasa

maandag 21 juni 2010

Finished !

Finally, after 4 months the window is finished and placed in the door.
The carpenter did a good job and all that is left is painting the door and replacing the door handle.
I'm very happy with the result and can't wait to start the next project.


View from the hall.


Detail.

View from the living room.

View from the living room with the other window in the back.

woensdag 16 juni 2010

The soldering finished.

Finishing the soldering an applying the past took quite a while but it's all finished now.
I'm taking the door and the window to the carpenter tomorrow.


Posted by Picasa


zondag 13 juni 2010

Almost there...

Very exiting seeing the panel without the distracting green paper behind it.
It looks great. I'm very pleased with the result so far.
One side is soldered here and I have flipped it to start on the other side so this side is still 'clean'.
As this window will be placed in a door there is no front or back but I tried to make sure the glass surface is the same on one side as the waterglass I have used has a bumpy side and a more flat side.

Soldering was, as I found in the other window, difficult at first to get the hang of it again and I have had some melt down accidents ! I don't mind, I was able to repair them and the joints will not be what you see best looking at the window but it will be the glass, so making a few soldering mistakes is ok.
I've counted the joints and there are 224 joints to be soldered together, on each side that is!
Tomorrow I'll apply the paste as I explained in my last blog, and let the window rest for a day.
When it's all finished and cleaned up, I'll make a photo and post this in my next post.

Posted by Picasa

dinsdag 8 juni 2010

Fully assembled.

Here it is, fully assembled.
Just a few lead strips will have to be replaced (they are to short) and then I can commence soldering all the joints on both sides.
After that I'll have to apply special paste to rub into the cracks between the lead and the glass.
Before this paste hardens I'll press the lead strips down on to the glass for a neat fit and then remove the excess paste.
The carpenter will make an opening in the door to fit the window in, next week.
I love my hobby !  :-)

Posted by Picasa

The top part is ready.

Choosing the right colour glass for the focal point of the top part was not easy. I tried out a some other colours like orange and a flaming brownish red and yellow, but I decided to choose blue with a different texture: there is some white in it too and it's not waterglass like most of the rest of the window.
For the teardrop shape I used that flaming brownish red and yellow. In the glass sheat I found a piece that was ideal for this shape. When the window is finished and there is light shining through the window I'll make a photo and post it so you can see what I mean.
This way the colours in this window and in the window of the bathroom door complement each other.

I have said it before that the sort of 'green' looking parts are really yellow glass: the paper underneath the window I used to draw the design on is old wallpaper of a green colour :-)


Posted by Picasa

dinsdag 18 mei 2010

How it looks so far.


As my glass room is very small and has for the most part an inclined ceiling, it is very difficult to get a top view of the whole window.
This is the best shot I could make.
Can't wait till it's finished!


------
I had to turn the plank with the window on it around to be able to reach the other end of the panel.
My glass room is great but like I said also a bit small. But I'll manage. I'm not complaining. It's great I don't have to work in the cold garage or something.

The last part will not be easy. Also I have not decided on the colours and what glass to use yet.
At the FOKA shop I bought a very nice blue glass with fine white stripes in it. I might use that.
Also a bevel (or bevels) is something I have thought of using in the top part of the window but that might be just a little to much. 
We'll see how things develope and I hope to finish this window within the next 2 weeks.


Making the centre piece.

As the Flower turned out not to bad this gave me some confidence to fit and solder the pieces of glass surrounding it.
In the first photo you can see the copperfoil on the sides that touch the Flower. These are the sides that will be soldered.


------
This is how it looks.
The egdes are still a bit rough and need grinding but I love the blue and red together.


------
Here you can see why this is called 'water glass'.


------
Here is the piece fitted in the window.
The soldering is not finished yet and looks very shiny and light compared to the lead strips.
This will all be solved when the rest of the window is soldered and cleaned up.

How I would love to have a light behind the window so I can show you the colours as they really are.
Be patient Marian !  :-)


zaterdag 15 mei 2010

Fitting in the Tiffany piece.

I'm very glad to have changed the design so it will be one window instead of two identical ones.
In the FOKA shop I found beautiful flaming red and yellow glass which will be fitted all around the edge with bright red squares in the corners.
The bottom part is completely finished now and I have made good progress today with the centre part. This is the part where the Tiffany flower (some people say it looks like a butterfly) will be fitted.
The rectangular pieces and the strips are easy to do so that went really well.

I forgot to say that at the bottom and at the top of the centre part a steel-lead strip is used to make the window more stable.
The surrounding lead strips are regular 6 mm strips as the window will be placed in a frame in the door.


In the photo's these rectangular pieces look like they are of a green colour but that is a distortion because of the green paper underneath it. It is all yellow waterglass like used in the centre of the window.


To solder the Tiffany piece together with the other pieces of glass it must be a tight fit so that will take some time to get it right, but it will be very nice to combine the lead strips with the Tiffany technique.
The straight lines surrounding the "Flower" will be lead strips and that part of the surrounding glass that touches the "Flower" will get a copperfoil pasted on it so to solder it tight to the Flower.
I have tried this once before in another panel and I like this combination of the lead strips and the finer lines you get with the Tiffany technique.


Posted by Picasa

dinsdag 4 mei 2010

New design of the livingroom door window.

This is the window for the livingroom door in the making.
I decided to make it one window in stead of two. This will look good too:
The original design is the centre of the window and all around I already have cut the yellow waterglass like used in the centre panel.
This photo gives you some idea of what it will look like.

The glass is not cut in the right meassures yet so they overlap at some parts. That will look better later.
Also because of the green paper underneath the glass it looks a bit green but it is the yellow like the inside.
Around it I would like to make an edge of a different colour brown glass with yellow flames and something different in the corners.
I'll be going to the FOKA shop in St.Oedenrode for supplies and glass this Saturday. I hope I can find glass with a sparkling colour there.


Posted by Picasa

maandag 3 mei 2010

Bathroom door finished.

You might remember my first large window, the one I made for the bathroom door.
The window was finished but the door and the little hallway it is in needed a lick of paint!
Well, that's almost done and I did not want to wait until yet another door is painted before I show you the result.