maandag 21 juni 2010

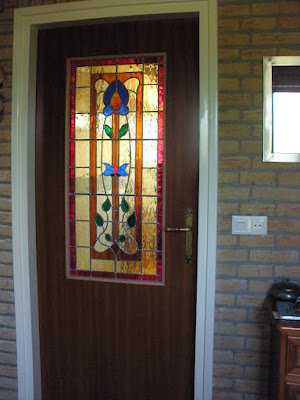
Finished !

Finally, after 4 months the window is finished and placed in the door.
The carpenter did a good job and all that is left is painting the door and replacing the door handle.
I'm very happy with the result and can't wait to start the next project.


View from the hall.


Detail.

View from the living room.

View from the living room with the other window in the back.

woensdag 16 juni 2010

The soldering finished.

Finishing the soldering an applying the past took quite a while but it's all finished now.
I'm taking the door and the window to the carpenter tomorrow.


Posted by Picasa


zondag 13 juni 2010

Almost there...

Very exiting seeing the panel without the distracting green paper behind it.
It looks great. I'm very pleased with the result so far.
One side is soldered here and I have flipped it to start on the other side so this side is still 'clean'.
As this window will be placed in a door there is no front or back but I tried to make sure the glass surface is the same on one side as the waterglass I have used has a bumpy side and a more flat side.

Soldering was, as I found in the other window, difficult at first to get the hang of it again and I have had some melt down accidents ! I don't mind, I was able to repair them and the joints will not be what you see best looking at the window but it will be the glass, so making a few soldering mistakes is ok.
I've counted the joints and there are 224 joints to be soldered together, on each side that is!
Tomorrow I'll apply the paste as I explained in my last blog, and let the window rest for a day.
When it's all finished and cleaned up, I'll make a photo and post this in my next post.

Posted by Picasa

dinsdag 8 juni 2010

Fully assembled.

Here it is, fully assembled.
Just a few lead strips will have to be replaced (they are to short) and then I can commence soldering all the joints on both sides.
After that I'll have to apply special paste to rub into the cracks between the lead and the glass.
Before this paste hardens I'll press the lead strips down on to the glass for a neat fit and then remove the excess paste.
The carpenter will make an opening in the door to fit the window in, next week.
I love my hobby !  :-)

Posted by Picasa

The top part is ready.

Choosing the right colour glass for the focal point of the top part was not easy. I tried out a some other colours like orange and a flaming brownish red and yellow, but I decided to choose blue with a different texture: there is some white in it too and it's not waterglass like most of the rest of the window.
For the teardrop shape I used that flaming brownish red and yellow. In the glass sheat I found a piece that was ideal for this shape. When the window is finished and there is light shining through the window I'll make a photo and post it so you can see what I mean.
This way the colours in this window and in the window of the bathroom door complement each other.

I have said it before that the sort of 'green' looking parts are really yellow glass: the paper underneath the window I used to draw the design on is old wallpaper of a green colour :-)


Posted by Picasa